Categories

Showing posts with label Tutorials. Show all posts

Wednesday, 18 March 2015

Looking to install KitKat back on your Lollipop handset? Here's how...

Android Lollipop is sure one heck of an operating system. It's pretty, it's immensely functional and it's sweet to the core. Google seems to have put its heart and soul into it, and the results do seem noteworthy. The much-talked about material design and all that glitter is perhaps one of the best that we have seen in recent times, something that puts even Apple's iOS to shame in many aspects.
All in all, Lollipop is visually stunning and very functional. But then again, Lollipop is yet to see its advent on most devices. While Nexus and Motorola devices, as expected have been the lucky ones with regards to the same, other OEMs are still burning the midnight oil to bring it to their respective devices.
But, let's just take a moment to remember everything that led to Lollipop. Before Lollipop, there was KitKat, and it was good. There's little surprise that more smartphones/tablets today ship with Android KitKat out-of-the-box, with some of them promised an update to Lollipop. No wonder, KitKat is such an important part of Google's ecosystem, and a significant revenue generator for the same.
If you're one of the many who have tasted Lollipop (Nexus, Moto owners), but still want to get back to KitKat for fun or for whatever reason, we are here with some tech tips to get you through the whole process in under 5 minutes.

Here's how you can revert back to KitKat from Lollipop:


Take note though, before you begin make sure you have a backup of all your data on your computer, drive (not the phone) because what you're going to do next will delete all the data on your Lollipop-based phone.
Also, we are using a Nexus device here for reference.
---Before you begin, you'll need the factory image of Android 4.4.4 for your respective device. You can download these from here. Note that, factory images for your respective Lollipop-based phone shall vary depending on model, so make sure you have the right one for you respective device.
---Once you have the required factory image, you're good to go. But wait, you need one more thing: ADB Tools for your computer. ADB Tools can be downloaded from XDA Developers Forum.
---Once you have the factory image and the ADB Tools (on your computer), the real stuff begins. Move and unzip the factory image to the ADB Tools folder on your computer.
---Make sure you have USB debugging enabled on your phone. Also, make sure you have the bootloader unlocked on your phone. This is one area where we would like to inform the obvious: TRY AT YOUR OWN RISK. Unlocking the bootloader may void your device's warranty.
---Once you're through these steps, turn off your Lollipop-based smartphone.
---Next you need to open your device to its Fastboot mode. Normally this is done by pressing the power button and volume down buttons together, when the device is switched off. Once you're in the Fastboot mode, navigate to the device's Recovery mode using the volume keys.  
---Next select wipe cache partition. Factory reset your device.
---Connect your device to your computer via USB cable.
---Navigate to the ADB Tools folder on your computer, till you find the file 'all.bat'. Double click it and KitKat will start installing on your factory reset smartphone. Once it's installed, your device will automatically restart.
---There you have it; you have KitKat running on your smartphone.
Of course, try this at your own risk though. Rooting your device is not always recommended, but hey, those you like to play around with gadgets don't mind their hands getting messy, do they?      

Thursday, 5 March 2015

Superfish scare: If you use Lenovo laptop, keep calm and follow these steps to stop hackers

All laptop makers install unwanted programs on their laptops. But Lenovo has apparently crossed the limit. It started pre-installing Superfish -- the company claims in good faith -- to its laptops in late 2014. However, there were reports that Superfish was not exactly what it seemed. Lenovo claimed that it helped users by giving them relevant product search results, read advertisement. But in reality the program was doing something more.


Now the reports have come in that Superfish was doing something really really nasty. And in doing so, and this is important, it was exposing Lenovo laptop users to private data theft and hacking.
So as a Lenovo laptop user what should you do? This Superfish incident is serious and you should be worried about it. But thankfully, given the nature of Windows, it can be dealt with successfully.
But before we talk about how to get rid of Superfish, keep in mind:
  1.  Lenovo says that only IdeaPad laptops are affected. ThinkPad laptops are fine.
  2.  Lenovo says that only the laptops sold in the last few months of 2014 are affected. It stopped pre-installing Superfish in January this year.
  3.  This also means if you have an old Lenovo laptop -- older than one year -- it is not affected by the Superfish.
Now, let's talk about what we can do to deal with Superfish. Follow these steps:
  •  If the machine is affected in Windows 8, click on search button and type "remove programs"
  •  From the search results, select "Add or remove programs"
  •  In the list of installed programs, look for Superfish Inc, VisualDiscovery
  •  Uninstall the program
  •  Go to C Drive > Programs > Delete the folders files associated with Superfish
  •  Remove Superfish security certificates (very important)
  •  To remove certificates, in Windows search "certificates"
  •  Click "Manage Computer certificates"
  •  From the list, select Superfish. Right click on it and then delete the certificate

Tuesday, 3 March 2015

How to Get Whatapp calling feature now (with little bit of luck)

WhatsApp is expected to introduce the calling feature in its app soon. This feature will allow people to talk to their WhatsApp contacts using the cellular data connection or Wi-Fi. This means they won't have to pay for the call charges. Only the data charges will apply, irrespective of where you are calling.
This is similar to Skype or Viber. But considering the user base of WhatsApp it is a big deal.
The feature is not yet officially available. But there are people using the calling feature in WhatsApp and you too get it now, with a little bit of luck.
But before we talk about the luck part, this is what you have to do to get the calling feature in WhatsApp:
  1.  You must have an Android phone that is running Android Lollipop. In fact at this moment, we are not even sure if the feature works on the non-Nexus phones or not. So it is even better if you have Android Lollipop on a Nexus device.
  2.  Uninstall WhatsApp.
  3.  Go to WhatsApp.com and download the app from there. This means you will get the latest app. This is an APK file.
  4.  If you know how to install the APK file install it. If not, follow these steps: Got to Android Play Store > Install ES File Explorer > Open ES File Explorer > Go to the downloaded APK > Install WhatsApp APK
  5.  Once you have the latest version of WhatsApp and if your phone has Android Lollipop, you need to find someone who has already got the WhatsApp calling feature. Ask around, ask your friends on Twitter and Facebook if any of them have the calling feature.
  6.  Ask the person who already has the WhatsApp feature activated to give you a WhatsApp call. 


Once you get the call, the same feature will also get activated on your phone. It will show different tabs for chats and calls. And you will get a phone call button in a chat window.Now here is the luck part. The feature doesn't get activated for everyone. It looks like WhatsApp is still testing it and even the users who get call from someone who already has WhatsApp calling feature are getting it randomly. Chances are that once you get a WhatsApp call, you too will probably get the feature. But if you don't, then you will have to wait for a few more weeks. It is expected that the calling feature in WhatsApp will be available soon.


Friday, 16 January 2015

How To Disable Startup Programs In Windows

If you are anything like me, then you will have lots of software on your PC. The trouble with this is that it takes longer and longer for Windows to start up. There are so many programs that add themselves to the list of programs, which start when you boot your computer.  It is good to clear out the programs that are not a necessity. This simple guide will assist you in disabling Startup Programs in Windows 8 or 8.1 or 10, Windows 7, Vista, or XP.


There are some programs that it is obviously a good idea to have them start with Windows, such as anti-virus and firewall software. Other programs starting upon boot however, just waste resources and increases your PC’s startup time. To disable a few of these programs, you can use a tool that is part of Windows, called MSConfig. It is this tool that allows you to quickly see what’s running at startup and then disable the programs you prefer to run later on as needed. This tool can be used to disable startup programs in Windows 7, Vista, and XP.

One way to run MSConfig is; Open the Start menu and type “msconfig.exe” (without the quotes) in the Search box.  When you see “msconfig.exe,” click on it or press Enter, if it is highlighted.* If you are running Windows XP, open the Run dialog box from the Start menu, type “msconfig.exe” in the Open edit box, and click OK.

Next, click the Startup tab on the System Configuration main window. There will now appear a list of all the startup programs displays with a check box next to each one. To prevent a program from starting up with Windows, simply select the check box next to the desired program so there is no longer a check mark in the box. Next click OK and a dialog box will display informing you that you may need to restart your computer for the changes to take affect. Choose either click Restart to restart your computer immediately or if are not yet ready to restart your computer, click Exit without restart.

you want to disable Startup Programs in Windows 8 or 8.1 or 10, follow these instructions;
Open up Task Manager by right-clicking on the Taskbar, or using the CTRL + SHIFT + ESC shortcut key, clicking “More Details,” switching to the Startup tab, and then using the Disable button.
If all else fails and you are uncomfortable using the above instructions, then you can run 3rd party software such as CCleaner from Piriform.  Apart form being a superb system cleaning program, CCleaner also has a tool, which allows you to disable startup programs. 

Open the program and click the Tools button on the left side of the dialog box and click Startup to see the list of startup programs. The Enabled column indicates whether each program is set to start with Windows. To disable a program that is enabled, select the program in the list and click Disable. The next time you start up your PC the changes will have taken effect.

There you have it. So, what are you waiting for? Time to clean up your Startup Programs!

*It is worth noting that MSConfig can also be used to configure several things other than startup programs, so please be careful!

Tuesday, 4 November 2014

Make your Computer Welcome You

Do you watch movies? Have you always loved the way how Computers in movies welcome their users by calling out their names? I bet that you too would want to know how you can achieve similar results on your PC and have a computer said welcome.

Then you are at the right place, this article describes exactly how you can make your computer welcome you like this.

With this trick, you can make your Computer welcome you in its computerized voice. You can make your Windows based computer say "Welcome to your PC, Username."

Make Windows Greet you with a Custom Voice Message at Startup

To use this trick, follow the instructions given below:-

  1. Click on Start. Navigate to All Programs, Accessories and Notepad.
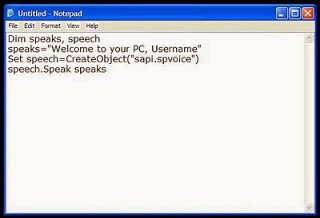
  2. Copy and paste the exact code given below.
Dim speaks, speech
speaks="Welcome to your PC, Username"
Set speech=CreateObject("sapi.spvoice")
speech.Speak speaks
     3.  Replace Username with your own name.
     4.  Click on File Menu, Save As, select All Types in Save as Type option, and save the file as Welcome.vbs or "*.vbs".
     5.  Copy the saved file.
     6.  Navigate to C:\Documents and Settings\All Users\Start Menu\Programs\Startup (in Windows XP) and to C:\Users\ {User-Name}\AppData\Roaming\Microsoft\Windows\Start Menu\Programs\Startup (in Windows 8, Windows 7 and Windows Vista) if C: is your System drive. AppData is a hidden folder. So, you will need to select showing hidden folders in Folder options to locate it.
     7.  Paste the file.


Now when the next time you start your computer, Windows will welcome you in its own computerized voice.

Note: For best results, it is recommended to change sound scheme to No Sounds.
You can change the sound scheme to No Sounds by following the steps given below:-
  1. Go to Control Panel.
  2. Then click on Switch to Classic View.
  3. Then Click on Sounds and Audio Devices.
  4. Then Click on the Sounds Tab.
  5. Select No Sounds from the Sound Scheme option.
  6. If you wish to save your Previous Sound Scheme, you can save it by clicking Yes in the popup menu.
  7. Click on OK
 

Make your Computer Talk

Have you ever wondered how can you make your computer speak whatever you input to it like in the movies? Would it not be fun? If only it was possible! Rejoice, because now it is possible. Well, if you wish to know how to do this, then you have come to the right place. With this trick, you can create a script in Windows which will make your computer speak whatever you input to it.

To create one such talk script, follow the steps given below:-
 
Steps
  1. Open Notepad.
  2. Copy and paste the exact code given below.
          Dim Message, Speak
          Message=InputBox("Enter text","Speak")
          Set Speak=CreateObject("sapi.spvoice")
          Speak.Speak Message
    3. Click on File Menu, Save As, select All Types in Save as Type option, and save the file as Speak.vbs or "*.vbs".
    4.  Double click on the saved file, a window will open like the one in the image. Enter some text in enter text column and click OK.

Now your Computer will speak / talk what you typed in Step 4. Try it yourself.

Windows Compatibility: This VBS file can be executed on all versions of Windows including Windows XP, Windows Vista, Windows 7 and Windows 8.

Personal Experience: I personally showed this trick to many of my friends and they were literally left awestruck. You too can impress your friends by making your PC talk and be the Computer Wiz.
 

Cool Keyboard Tricks (Windows) Make a Disco

Keyboards usually have small LEDs which indicate whether different types of locks are activated or not. Here is a trick to use the lights of your keyboard in a more creative manner in Windows.

This trick uses a simple Visual Basic Script which when activated makes your Scroll lock, Caps lock and Num lock LEDs flash in a cool rhythmic way which gives the perception of a live disco on your keyboard.


To make your own live disco, follow the steps given below:-

1. Open Notepad.
2. Copy paste the exact code given below:-

Set wshShell =wscript.CreateObject("WScript.Shell")
do
wscript.sleep 100
wshshell.sendkeys "{CAPSLOCK}"
wshshell.sendkeys "{NUMLOCK}"
wshshell.sendkeys "{SCROLLLOCK}"
loop

3. Save the file as Disco.vbs or "*.vbs".


Double click on the Saved file to see the LED lights on your keyboard go crazy and make your own cool disco.

This trick has been tested on Windows XP, Windows Vista, Windows 7 and Windows 8 and found to be working perfectly.

You can disable the keyboard disco by starting Task Manager and ending the wscript.exe process.

Sunday, 2 November 2014

How to Run Whatsapp On Pc (Windows and Mac Supported).

As we all know that mostly each and everyone with a Smartphone in his/her hand has Whatsapp on his/her Smartphone as Whatsapp is a free messaging app which provides free messenging all around the World through internet.But how about having Whatsapp on Pc?Isn’t it awesome ! Today I’am gonna show you guys how you can get Whatsapp on your Pc absolutely free


How to Run Whatsapp On Pc (Windows and Mac Supported) :-

1)First of all go to the Bluestacks Website and download and Install the Bluestacks Software it is available for both Mac and Windows.

Bluestacks Website

2)After Downloading and Installing Bluestacks Run it.


3)Now click on search and type in Whatsapp and then click on Install as you can see in the Image below.

Whatsapp Searched

4)Now it will find Whatsapp on 3 Stores I will prefer downloading from Play Store which is the third one so click on it,as you can see in the Image below.

Whatsapp Searched on 3 Stores

5)Now it will take you to the PlayStore so just click on Install–>Accept.

Whatsapp Install

6)It will now download Whatsapp for you as you can see in the Image below.

Whatsapp is Downloading

7)After it is Installed click on Open.

Whatsapp Downloaded

8)Click on Agree and Continue.

Whatsapp Opened Agree and continue

9)Now it will ask you for the mobile number where it will send you the activation code just enter any mobile number where you would like to receive the activation code and then click Ok.Just enter the activation code which you will receive by SMS.

Whatsapp Enter Mobile Number

Tip:-If you are not able to enter activation code which is received by Message then you can receive the activation code from other method i.e by receiving a phone call from them.

10)Now Enter your Whatsapp name,you can enter whatever name you would like to display on Whatsapp and then click on Next.

Whatsapp Name

How to Add Contacts to Bluestacks:-

1)In order to use Whatsapp you will need to add Contact so in order to add Contact click the Icon shown in the Image below and then Click on Contacts.

Whatsapp Contacts

2)Now it will open a new screen now once again click on the same Icon and now you will see a new option called New Contact now click on it.

Whatsapp New Contact

4)It will take you to the Add Contact page just Enter the name and the mobile number of the person with whom you would like to chat,after filling all that information click on done and that Contact will be added.

New Contact Added

How to Add Contact to Whatsapp:-


1)After adding the Contact go back by pressing the back button.

New Contact Added Back Pressed

2)Now you will see the Whatsapp screen now just click the top right Icon which will be a “+” sign.

Whatsapp Click here

3)As soon as you click on that you will see a new screen where your added Contacts will be displayed.

Whatsapp Select Contact

4)Click on any Contact with whom you would like to chat.As you can see in the Image below the same Whatsapp chatting screen will be there and you can even Take a photo if you have a Webcam and send to the person as well as you can send Video or Images from the Gallary same as we used to do on a Cellphone.

Whatsapp Chatting

  Thanks for reading if you like my post then kindly like and share the knowledge.Subscribe to my Newsletter or you can add me to your Google Plus circles to stay update with my latest posts and if you have any doubts then comment down below and I will be glad to assist you !

Monday, 27 October 2014

How to Use the Clone Stamp Tool in Photoshop

Arthur C Clarke’s third law of prediction states – “Any sufficiently advanced technology is indistinguishable from magic.” and if you’ve ever used the clone stamp tool in Photoshop, you’ll know exactly what Arthur was talking about. Using a very simple technique of allowing you to sample areas of an existing image and use them as a brush, you can create amazing effects with very little effort.


The clone stamp tool works by allowing the user to select a point in an image, and then copy it in real time to any other part of the image, it’s particularly effective if you have a complex organic pattern or texture and want to seamlessly cover over or expand an area elsewhere in the image. You can also, of course, clone part of a completely different image, so it’s also a very quick and simple way of mixing elements of different images into one. It is also often used for removing blemishes on photographs, something I’m sure we’ve all been tempted to try.

The real trick of using the clone stamp tool is to master juggling opacity and brush hardness, so open any image of a face and try doing the following to get to grips with this new toy.
Nine items down on the left-hand Photoshop toolbar is what looks like a hand inkstamp, this is where the Clone Stamp and Pattern Stamp tools live. Right click and make sure the clone stamp tool is selected.

On the top toolbar where it says Brush, there is an arrow pointing down, click this to open the Brush parameters and alter the size of the brush to about the size of the eye on your face image and set the hardness to 40%. This means that whatever you are cloning will have a nice soft blended edge. Now move your cursor any area of the face that has a large area of skin, so probably the cheek or forehead. Press and hold the ALT key and left click on the centre of this area, this is where your clone stamp will sample. Move the cursor over a facial feature like the eye or nose, and use the clone stamp, it will brush the same image you sampled over the new area. Experiment with this and see if by sampling different areas you can produce a featureless face. If you find the cloned area does not blend well, try sampling a different area that is nearer the portion you are replacing until you get a better match.

Now try something subtler, open the original image, and this time also set the opacity to 70%, now find a blemish, a mole, spot or discoloured area on the face, sample a clear area using the ALT key and brush over the blemish, the opacity setting will smooth over the skin, very useful for tidying up photos and something magazines do as a matter of routine.

Since you have mastered the basics, try sampling more outlandish features, try an opaque soft brush sampling a leopard and brushing over another animal, give it a leopardskin makeover. You’ll soon be working magic.

Wednesday, 27 August 2014

How To Scan Specific Folders For Duplicate Files Using Gemini

The one thing that I don’t like about using my Mac is the amount of duplicate files I accumulate.  I suppose the very same thing happens to me when I use my Windows machine, but because I use my Mac more often, I end up with more duplicates. And I hate having more than one version of a file for no good reason. So, it is important to know how to remove those pesky duplicate files.

Free up system space by deleting duplicate files with Gemini.

I like to use a great little program called Gemini.  The application will quickly locate and remove duplicate files from your Mac. The simple user interface will allow you to drag and drop your folders into Gemini and this is where they will be scanned for identical file traits. If any duplicates are located, a quick click on the Auto Select button is all that is needed to delete them forever.

Simply start the application and click on the + symbol.  A dropdown window will now appear; giving you the option to choose which folders you wish to scan.  This is particularly useful if you only want to scan for certain media types, such as AAC files in iTunes, for instance.  Now you need to highlight the folder you want to scan and click Add and Scan.  If Gemini locates any duplicates, you can see them by clicking the ‘Show Results’ button.  Now you can choose which versions to delete and which versions to keep. The files will appear under headings of Pictures, Documents, Folders and Other. You can select the file version to appear by size, type, name, count, selected and path.

Gemini uses unique algorithms that make scanning and removal fast and trustworthy.  The Gemini application ensures that you will keep at least one version of each duplicated item, so you don’t need to worry about wiping out anything permanently.

CLICK HERE TO DOWNLOAD GEMINI

How To Use Opera Link

Opera is great alternative to the other ‘main’ selection of browsers on the market today. And a great feature of Opera is Opera Link.  This feature allows you to share your data between all your computers and devices, which run the Opera browser. The functionality of Opera Link allows it to synchronize your browser information like bookmarks, Speed Dial, passwords and notes.  In this way, they become available to you wherever you go or wherever you are.

Opera Link is a great way that you can share all your data accross all of your devices.

All you need to use Opera Link, is the Opera browser and an Opera account. You can use your Opera account for the My Opera community website, the developer site Dev.Opera, and Opera Unite.

To Enable Opera Link on a PC you need to navigate to the browser menu, select Tools > Synchronize Opera > Enable Synchronization.  You now need to Log in with your Opera account username and password.  If you don’t have one just simply create an account by clicking I don’t have an account.  Next, in the Options dialog, you need to choose what sort of browser data you want to synchronize and click Next. You have now synchronized the browser data and Opera will continue to synchronize your data until you log out.

To Enable Opera Link on your smartphone you need to open the Opera app on your phone and navigate to Menu > Settings > Opera Link.  If you are running an older version of Opera, such as Opera Mini 4.3, just navigate to the start page and select Synchronize Opera.  You now need to log in with your Opera account username and password, or if you don’t have one, create it by completing your details. You have now synchronized the browser data and Opera will continue to synchronize your data until you log out.
You can even log in to a web version of Opera Link, which allows you to access some of your synchronized data, such as bookmarks, Speed Dial and notes.  You can access this information from any web browser, simply  head over to link.opera.com and log in using your Opera account details.

Thursday, 21 August 2014

How to build your own Nasa-approved Mars Rover

Now, you can build your own Mars Rover. The only hassle is that you cannot launch it for the Red Planet!

The space agency Nasa, in partnership with New York-based hardware startup LittleBits, has launched a space kit that enables you to build your own Mars Rover at a school or college lab or at home.

The kit comes with 12 "bit modules" that provide things like power, remote triggering, light sensing and motorisation.

In collaboration with Nasa's Goddard Space Flight Center, LittleBits also came up with 10 activities that allow users to build everything from a satellite dish to a miniature Mars Rover.

"Our mission is to allow anyone to create their own hardware, to make playing with electronics more like playing with Legos," Ayah Bdeir, founder and CEO of LittleBits, was quoted as saying in Wired.

"We're taking one field at a time where technology is prevalent but people don't really understand it, then we're breaking it down and giving people the bricks so they can participate in it," Bdeir added.

LittleBits sells kits of circuit blocks that snap together with magnets - no soldering, wiring, or programming is required - and can be combined to fashion millions of different gadgets, from synthesizers to remote control cars.
"It's about starting small and building complexity as people want it," says Bdeir. "That's a very effective way to learn something."

The kit costs $189 (Rs.11,300) and you can buy it online from the LittleBits website.
https://www.youtube.com/watch?feature=player_embedded&v=XnEhVqAdsqo

Wednesday, 20 August 2014

Amazing Tricks to Speedup Pendrive Data transfer.

Pen drives or USB are quite popular in the digital world for instant transfer of data. Using USB flash drives, one can easily transfer large files from one PC to another, from PC to laptop, from laptop to TV, and vice versa. This latest technology has made our work easier than before. In current times, you can move Gigabytes of information into just a tiny pen drive within few seconds.

In recent years, a lot of changes has been made in storage devices. When you compare new pen drives with the older ones, you will notice a considerable high transfer rate in the latest ones. However, there are times when you can get irritated with slow transfer speed of pen drives while copying data in pen drives. Well, this article shall provide you with some tricks using which you can Speedup Pendrive Data Transfer Rate

Factors responsible for data transfer rate:

 
Before knowing the tricks, we shall have a look at some factors responsible for data transfer rate , and they are as follows.
 
1.Pen drive ageing: Well, this is common for any device that when it becomes old, the rates gets slower.

2.Type of files: The transfer rate of data also depends on the file type; you might have noticed that songs, videos and documents take very less time in transfer while application files need more time.

3.USB port version: The most popular version of USB is 2.0, and it will give you 35mbps speed. So, if you want fast speed then buy 2.0 version pen drives.

Few tricks to Speedup Pendrive Data Transfer Rate:


1.File system should be NTFS: If you want to Speedup Pendrive , then make sure you have NTFS as file system. You can do so by Right clicking on your pendrive and selecting Format,Select NTFS File system, Uncheck Quick Format And Click On Start.
2.Disk errors: To check disk errors go to the properties tab of your pen drive, then select ‘tools’ tab. You will find a ‘check now’ button, click it and then hit ‘start’ to fix the errors. The time taken for scan depends on the size of the pen drive.


3.Device policy: Under properties of your pen drive, select ‘hardware’ tab. Then select USB device from there that will lead you to a pop up window where you need to change settings. You can even have better performance of pen drive by clicking the option under ‘hardware’ tab.

4.Format: This is one of the effective options that many users have tried. When you have used your pen drive for quite a long time, you can speed it up by formatting the device.

Carefully test your pen drive with the factors given above to Speedup 
 Pendrive. In addition to this, you should keep checking for these aspects regularly, say twice or thrice in a month.

Customize folders with different colors in Windows

There are many softwares available today over the internet which can Customize your Computer in an efficient manner that it looks so attractive as well as it becomes very easy to use. We always want our computer to be clean and well organized so that whenever we need to access something or need to search a particular file/folder in our computer we could find it easily.


As similar to that, here I am going to share a software through which you can easily assign your favorite colors to your desired folders in order to differentiate them easily and to ease of access.

 Just follow the two simple steps given below to customize your folder :

Step 1 :

First of all Download and install the software FolderColorizer. It is tested and 100% virus free. You can download it from here :  http://www.datafilehost.com/d/f60d92f9

Step 2 :

Now after installing the software, simply right click on any folder which you wish to customize. Here when you right click on folder, you will see a new option in the context menu i.e. Colorize !. Now simply go to that option and one submenu will appear. Now choose any color you want to assign to this folder.

Although it is a free software for everyone to use it but while you will use this software for the very first time , it will just ask your email id for activation of this software. But no need to worry because you wont need to confirm the activation by logging in to your e mail account. Even if you don’t wish to share your e mail id with developers of this software you can do it because product will be activated automatically once you enter any email id. So you can also enter any fake id if you want.
For your convenience I am providing you a screenshot of above mentioned procedure for changing folder color :


In this way you will be able to easily organize folders in any of your drive weather C: , D: or any other drive. You can also assign different colors to several folders in the same drive to give it more attractive and cool looks.


Tuesday, 19 August 2014

How to Speed Up Chrome Browser Easily

Today I will be Sharing some cool tricks and tweaks by which you will be able to Speed up Chrome browser. Do you know that experts which are sitting at future mark says that Google chrome is one of the fastest internet browser. Rightly said, As you have already experience while using google chrome that it really works faster and smoother compared to other internet browser. Google chrome uses DNS prefetching and speedy (SPDY) protocols instead of simply using HTTP. These DNS prefetching and SPDY protocols load up your page in advance so that you need not to wait for more time.


But It happens many times that google chrome starts working very slow and believe me that  is very frustrating. But you need not to worry any more because listed below are some nice tricks to speed up chrome browser


1. Disable plugins

I can bet you that you are using many plugins which are generally not in your use. To work faster and smoother on your chrome browser you must have some selected plugins installed. Too much plugins can slow up your browsing speed. Follow the steps below and start removing your extra plugins from your browser.

1. Open your chrome browser and go to the following address
chrome://plugins/

Note: Be very careful while unchecking or deleting your unwanted plugins because there are many plugins which are responsible for the performance of your browser. You may not want to disable plugins like flash because many web sites use flash to display web pages.

2. Disable Extensions

You might wonder if Plugins and extensions are almost similar to each other?  Plugins are usually a third party programs which are needed to enhance the speed and performance of your browser but other than this extensions are specifically needed for browsers.

These Extensions really slows up your browser and can affect your browsing speed very badly. To avoid this thing you just need to follow the below steps carefully :-

1. Open your chrome browser and type the following address in the address bar
 chrome://extensions/

OR

To check the full list of extensions installed in your browser, simply Click on Wrench icon on your toolbar, navigate to Tools and then click on Extensions.

2. You will now going to see an extensions list which is supporting your browser.

3. Simply uncheck the extensions which are not needed or just delete those extensions which are not needed in future.

You will surely see some changes in your browsing speed as you delete those extensions from your browser.

3. Clear your browsing data

You already know that if you browse any website, chrome automatically collects the cached text, cookies and other kinds of website data. That is why when we click again on that website address it consumes less time for loading that web page.

Although cached and cookies are really made to speed up chrome browser but sometimes it happens that they are responsible for decreasing your browsing speed and lagging.

Following steps will be helping you in clearing your browsing data:-

1. Click on Control and customize chrome button or Wrench icon as i mentioned earlier.

2. Choose Tools > Clear browsing data.

3. Simply, choose the time range and other types of  extra features which are listed below in that dialog box, hit Clear browsing  data.

That’s all. I Hope you this article will some what help you clear your question how to speedup chrome browser?  if you face any type of problem or confusion after reading this article you can surely leave a comment below in the comment box.


BEST MOZILLA FIREFOX ADD-ON TO DOWNLOAD YOUTUBE VIDEOS

Did you ever thought downloading YouTube video can be so easy that there is a Download button available on YouTube video watch page. Never!!!

 
Did you think I am dreaming, no.. absolutely not. We know that YouTube will not add download button but this doesn't mean that it is not possible. I am not joking, this can be possible because of a Mozilla Firefox add-on. Just install Mozilla Firefox add-on available on http://goo.gl/TFiJ3v .


Wednesday, 13 August 2014

How To Use Older Programs On New Versions Of Windows

I admit that it took me a while to switch over from Windows XP to Vista and then it took me pretty much no time at all to switch back, may I add.  But when Windows 7 was released, I was all over it.  I don’t really like using any of Microsoft’s OS but I have got to admit it, the guys over in Redmond hit the nail on the head with Windows 7.  Don’t get started on Windows 8 though!


But if you have made the jump to Microsoft’s flagship OS then you will no doubt already be aware that some of your old programs don’t work anymore.  But all is not lost as there are a few tricks you can try.

The issue appears to affect software that has been developed for Window XP more than other operating systems, as XP is very different from Windows 8, but not so different from Windows 7.  In most cases, you should be able to install older programs in both Windows 7 and 8, but upon trying to launch them, you will receive an error message.

If you rely on that legacy software for some reason, you basically have the following two options:

1) Using the compatibility mode in Windows 7 and Windows 8.
2) Using a virtual machine.

The compatibility mode is easy to use and so we will cover that option here.  By using the compatibility mode you can modify the program to fool it into thinking it is using an older version of Windows.

First of all you need to Open Properties of the application, with the right mouse button, click on the program icon and then click Properties.  Next, you need to enable the compatibility mode.  You do this by navigating to the Compatibility tab and enable the compatibility mode box.  You now need to select the desired compatibility mode.  You could select the OS you used to run the software on, but if it still does not work, you can try Vista or Windows 7 instead of Windows XP. Click OK and close the window.  If the compatibility mode does not work, you can try Windows XP mode as the alternative solution.

If that still does not work then you may be looking at installing a VM – Virtual Machine, using software such as Virtual Box.


Monday, 4 August 2014

How To Defragment Your Hard Disk Using Defraggler

When you make changes on your PC, the data is stored on your hard disk.  Anything you are likely to do on your PC, such as using copy, paste, delete and even saving files will result in disk fragmentation.  The files that you modify are stored in a separate segment on the hard disk from the original file location. This is where, over a period of time, your system can slow down and become unresponsive, because your computer is looking in different places to open a file.


A great tool for defragmenting your hard drive is Defraggler.  It is a free application that offers you various different options to defragment the hard disk. The application is actually better than Windows’ native defragmentation tool!  When you open Defraggler, if you navigate to Settings and then Options, you will find plenty of different options to tweak. You can exclude certain files from being defragmented.  This can be done according to drives, folders, file or file type.  If you want to, you can also schedule the defragmentation to occur at a particular time daily, weekly or monthly.
To start off,  you need to inform Defraggler which drive you want to scan (usually C:) and click the Analyze button.  This will check to see if you actually need to defragment your disk.  The results are displayed in a Drive Map graphic and text.  If the drive needs to be defragmented then just click the Defrag button to begin the defragmentation process*.  You will see the progress in the Status section.  Once the process is complete, you can restart your computer with a freshly defragged hard drive.  That’s it!

*During the defragment process your computer will slow down.

Saturday, 26 July 2014

A TRICK TO DOWNLOAD A YOUTUBE VIDEO WITHOUT SOFTWARE/DOWNLOADER

In this post you will come to know about the easiest and simplest way to download a youtube videos without any software or downloader.This trick works in all browsers and all platforms just follow the simple step given below and enjoy the post

STEP 1: First of all go to youtube and search your desired video


 STEP 2: Select the desired video you want to watch

STEP 3: Add "ss" in watch video URL and press "ENTER"

STEP 4: A new page will open


STEP 5: Select the desired video format for your compatible and download it......

If you enjoy this trick share it and comment below:

Wednesday, 25 June 2014

How To Erase Data From A Hard Drive

Data is important to everyone.  The last thing you need is someone you don’t know getting hold of your information.  It is important then, to know how to erase your data from your computer. You may need to do this because your computer is being sold or given away to a friend or relative.

You may just want to erase the data and make a fresh install of another operating system or upgrade your existing operating system.  Either way, the result of these actions will be erasing all of your personal data and your files from the hard drive.

The first thing to do is to back up any information that you want to keep.  This can be anything from files and documents to pictures and music.  You can use an eternal hard drive, a CD/DVD or a USB flash drive or even a memory card.


If you use Microsoft Windows as your operating system of choice, then one of the easiest ways to erase hard drive data, is to go to My Computer, right click and select Manage. This will then open the computer management window.  Click on disk management.  Next you will see a list of discs depending on the number of partitions you have on your PC. Select the disc you want to erase.  You will then be taken to another window with one of the options to perform a Quick Format.  Also if you want to rename the disc, you can do this here.  Once you click OK, you will be given a warning, which informs you that formatting will erase everything on the hard drive.  Another way to erase all the data on a Hard Drive is by re-installing the Windows operating system and informing the PC to delete the current partition and install on a fresh one.

If you use a Mac operating system then you can erase your data by navigating to the Applications folder and then the Utilities folder.  Inside Utilities, will be a program called Disk Utility. If you open this, you will be given a list of drives that are currently mounted on the computer.  In the left side of the window you will see a list of drives, select the one you want to format and click Erase. This is also where you can give the drive a fresh name if you so wish.

It is important to remember, that when you erase data on a hard drive you WILL LOSE ALL YOUR DATA on that drive.  Please make a back up before you start.